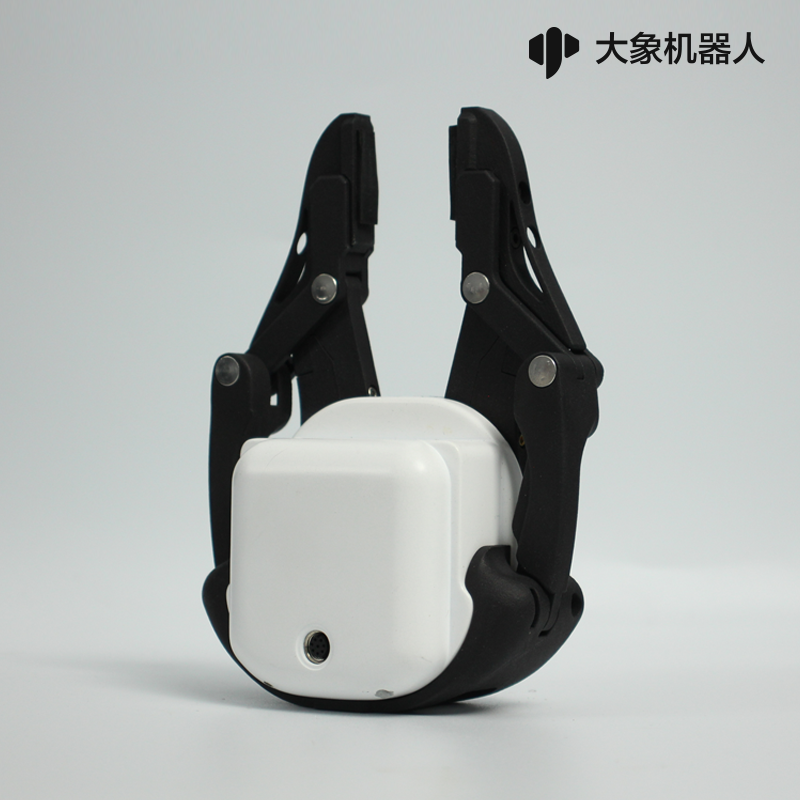
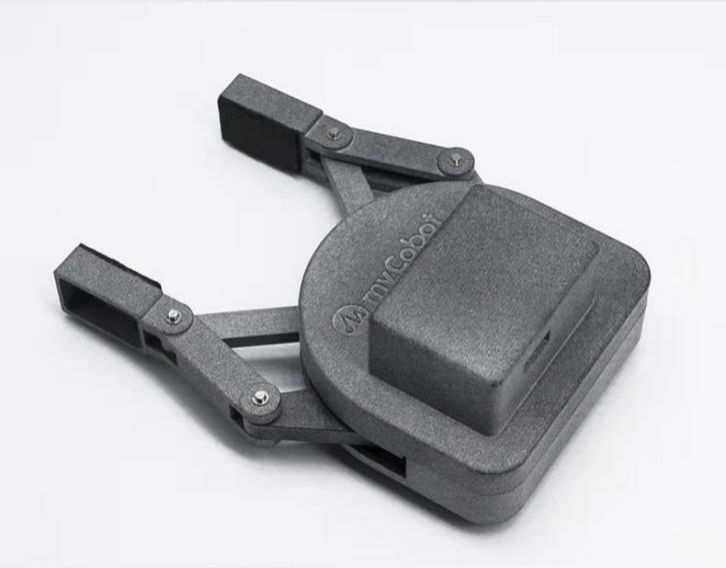
myCobotPro Adaptive Gripper
Compatible models: myCobot 320, myCobot Pro 630
product icon
Specifications:
| name | myCobotPro Adaptive Gripper Black and White |
|---|---|
| Material | Photosensitive resin + nylon |
| process technology | 3D printing |
| clamping rangeclamp size | 0-90mm |
| clamp force | 1000 grams |
| Repeatability precision | 0.5 mm |
| service life lifetime | 1 year |
| drive mode drive | electric |
| Transmission modetransmission | gear+connecting rod |
| size | 158x105x55mm |
| weightweight | 350 grams |
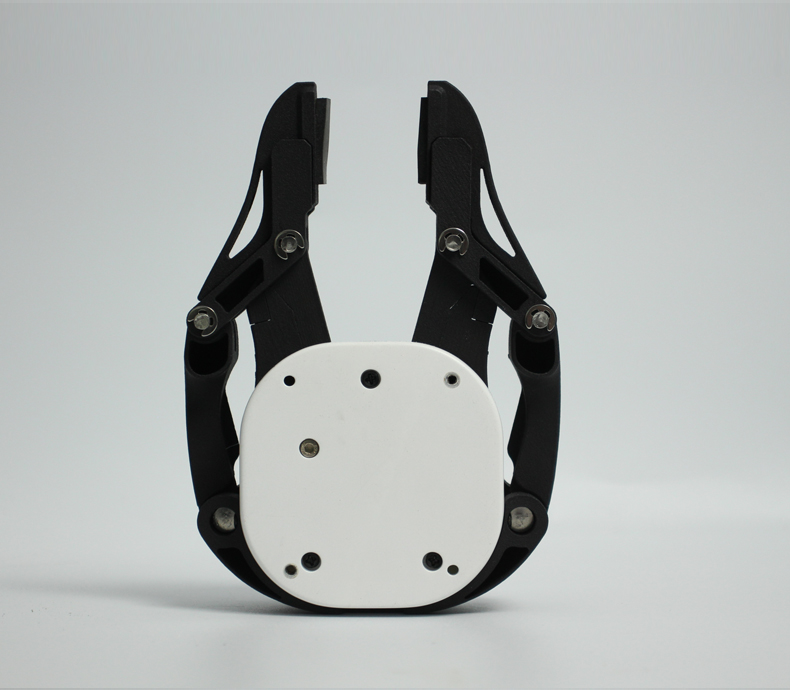
| Fixed method fixed | screw fixed |
| Use environment requirements | Temperature and pressure |
| control interface control | Serial port/IO control |
| Applicable equipment | ER myCobot 320 series, ER myCobot Pro 630 |
Use for Gripping Objects
Introduction
A gripper is a robotic component that can function like a human hand. It has the advantages of complex structure, firm grasping of objects, not easy to drop, and easy operation.
The gripper kit includes gripper connecting wires and flanges, and controls the end effector of the robotic arm through a programmable system to realize functions such as object grabbing and multi-point positioning. Gripper can be used in all development environments, such as ROS, Arduino, Roboflow, etc.
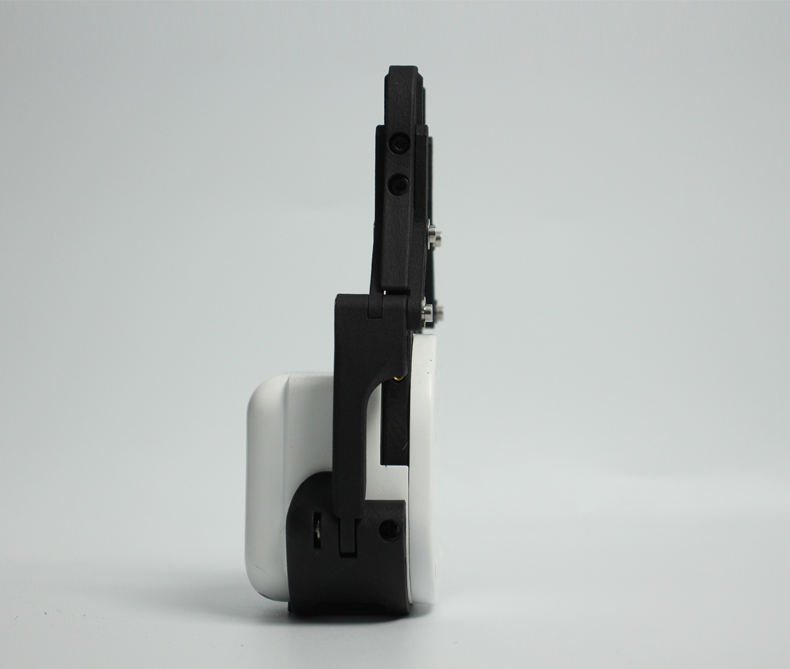
working principle
- Driven by a motor, the finger surface of the gripper makes a linear reciprocating motion to realize the opening or closing action. The acceleration and deceleration of the electric gripper is controllable, the impact on the workpiece can be minimized, the positioning point is controllable, and the clamping is controllable .
Applicable object
small cube
small ball
long object
Mall link:
How to use
- Installing
If the video fails to load, please click the link below to view the video. Installing Vidio
Installation and use
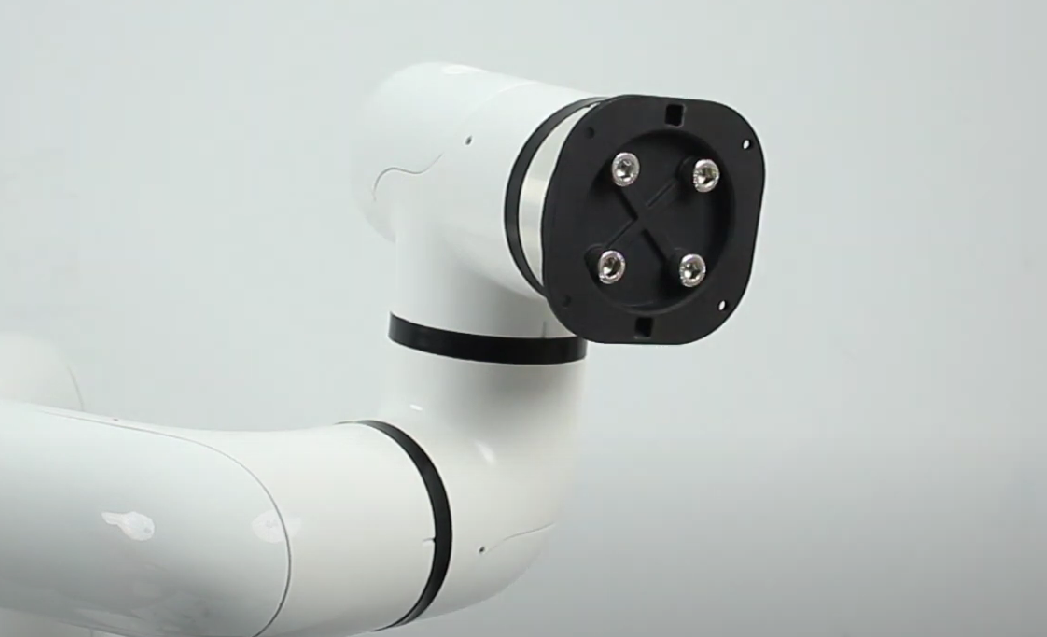
- gripper mounting:
Structural installation:
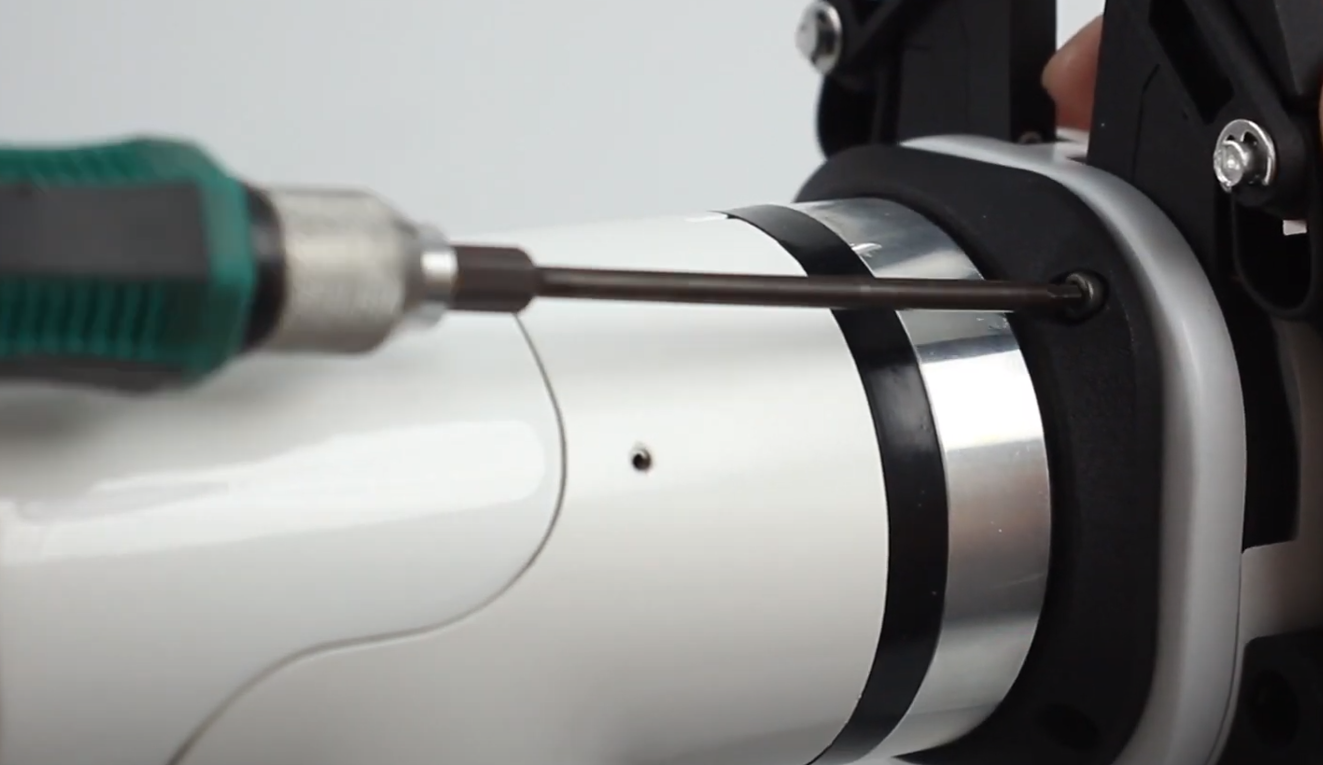
Align the spacer with the hole at the end of the arm and tighten with the screws:
Align the screw holes in the gripper with the holes around the gasket and tighten with the fine screws.:
- electrical connection:
Take care to do this with the robotic arm powered off.
- Align the m8 cable with the connector of the robot arm, note that the connector has a notch and the connecting cable has a corresponding protrusion, confirm the direction and then insert it and tighten it:
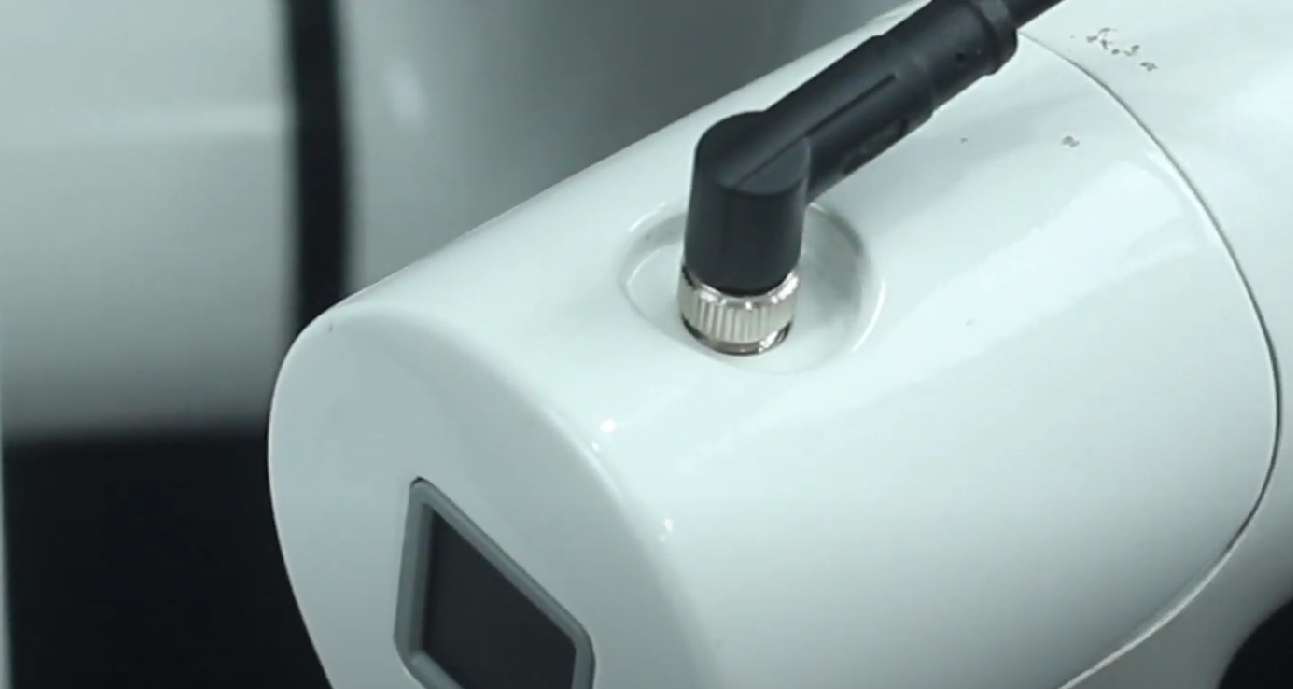
- Insert the gripper control connector, again paying attention to the orientation of the notch:
- Align the m8 cable with the connector of the robot arm, note that the connector has a notch and the connecting cable has a corresponding protrusion, confirm the direction and then insert it and tighten it:
- electrical connection:
myCobot Pro 320 Instructions for use
Programming development (python):
Programming and development of the gripper using python: python environment download
Create a new python file:
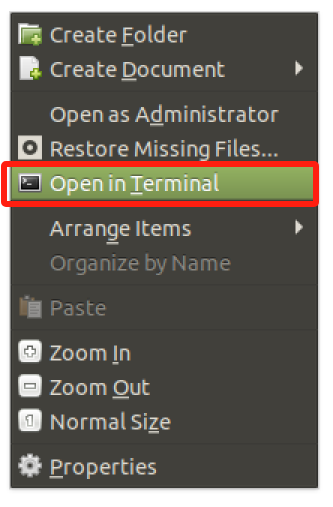
Right click on the desired file path to create a new python file: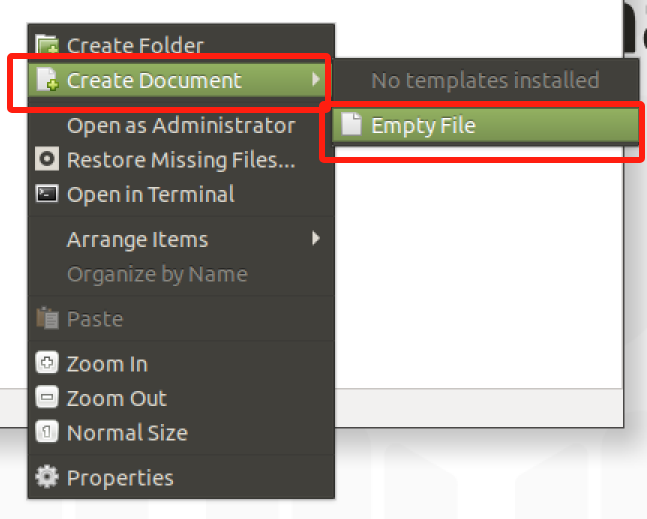
The file name can be changed as needed

Perform function programming:
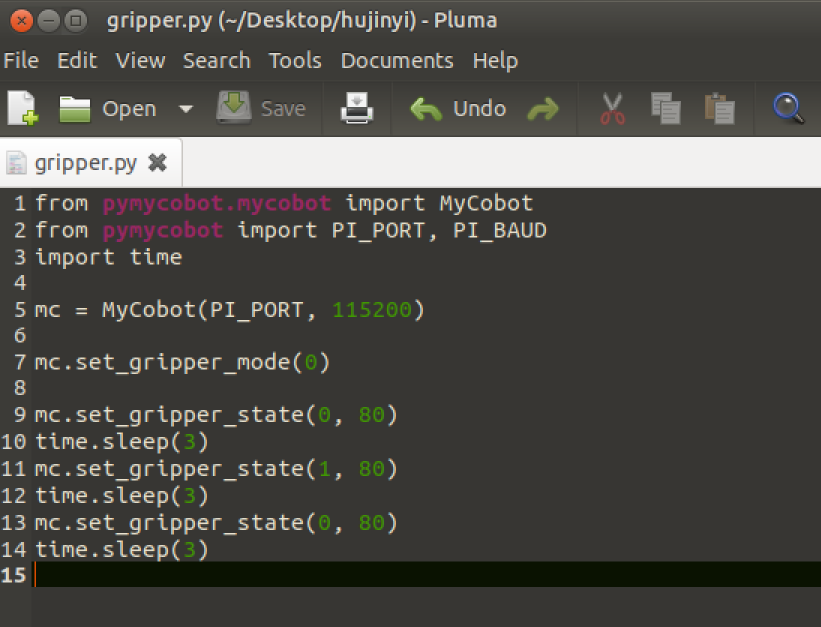
The code is as follows:
from pymycobot import MyCobot320
import time

# Initialise a MyCobot320 object
mc = MyCobot320("COM3", 115200)

# Setting the gripper to 485 mode
mc.set_gripper_mode(0)
# Controls gripper open-close-open:
# Using the gripper status interface 0 is open, 1 is closed
mc.set_gripper_state(0, 80)
time.sleep(3)
mc.set_gripper_state(1, 80)
time.sleep(3)
mc.set_gripper_state(0, 80)
time.sleep(3)

# For more information on using the interface, see the python API.
Save the file and close it, right-click on an empty space in the folder to open a command line terminal
Input:
python gripper.py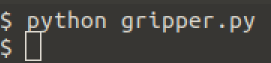
You can see the gripper open-close-open
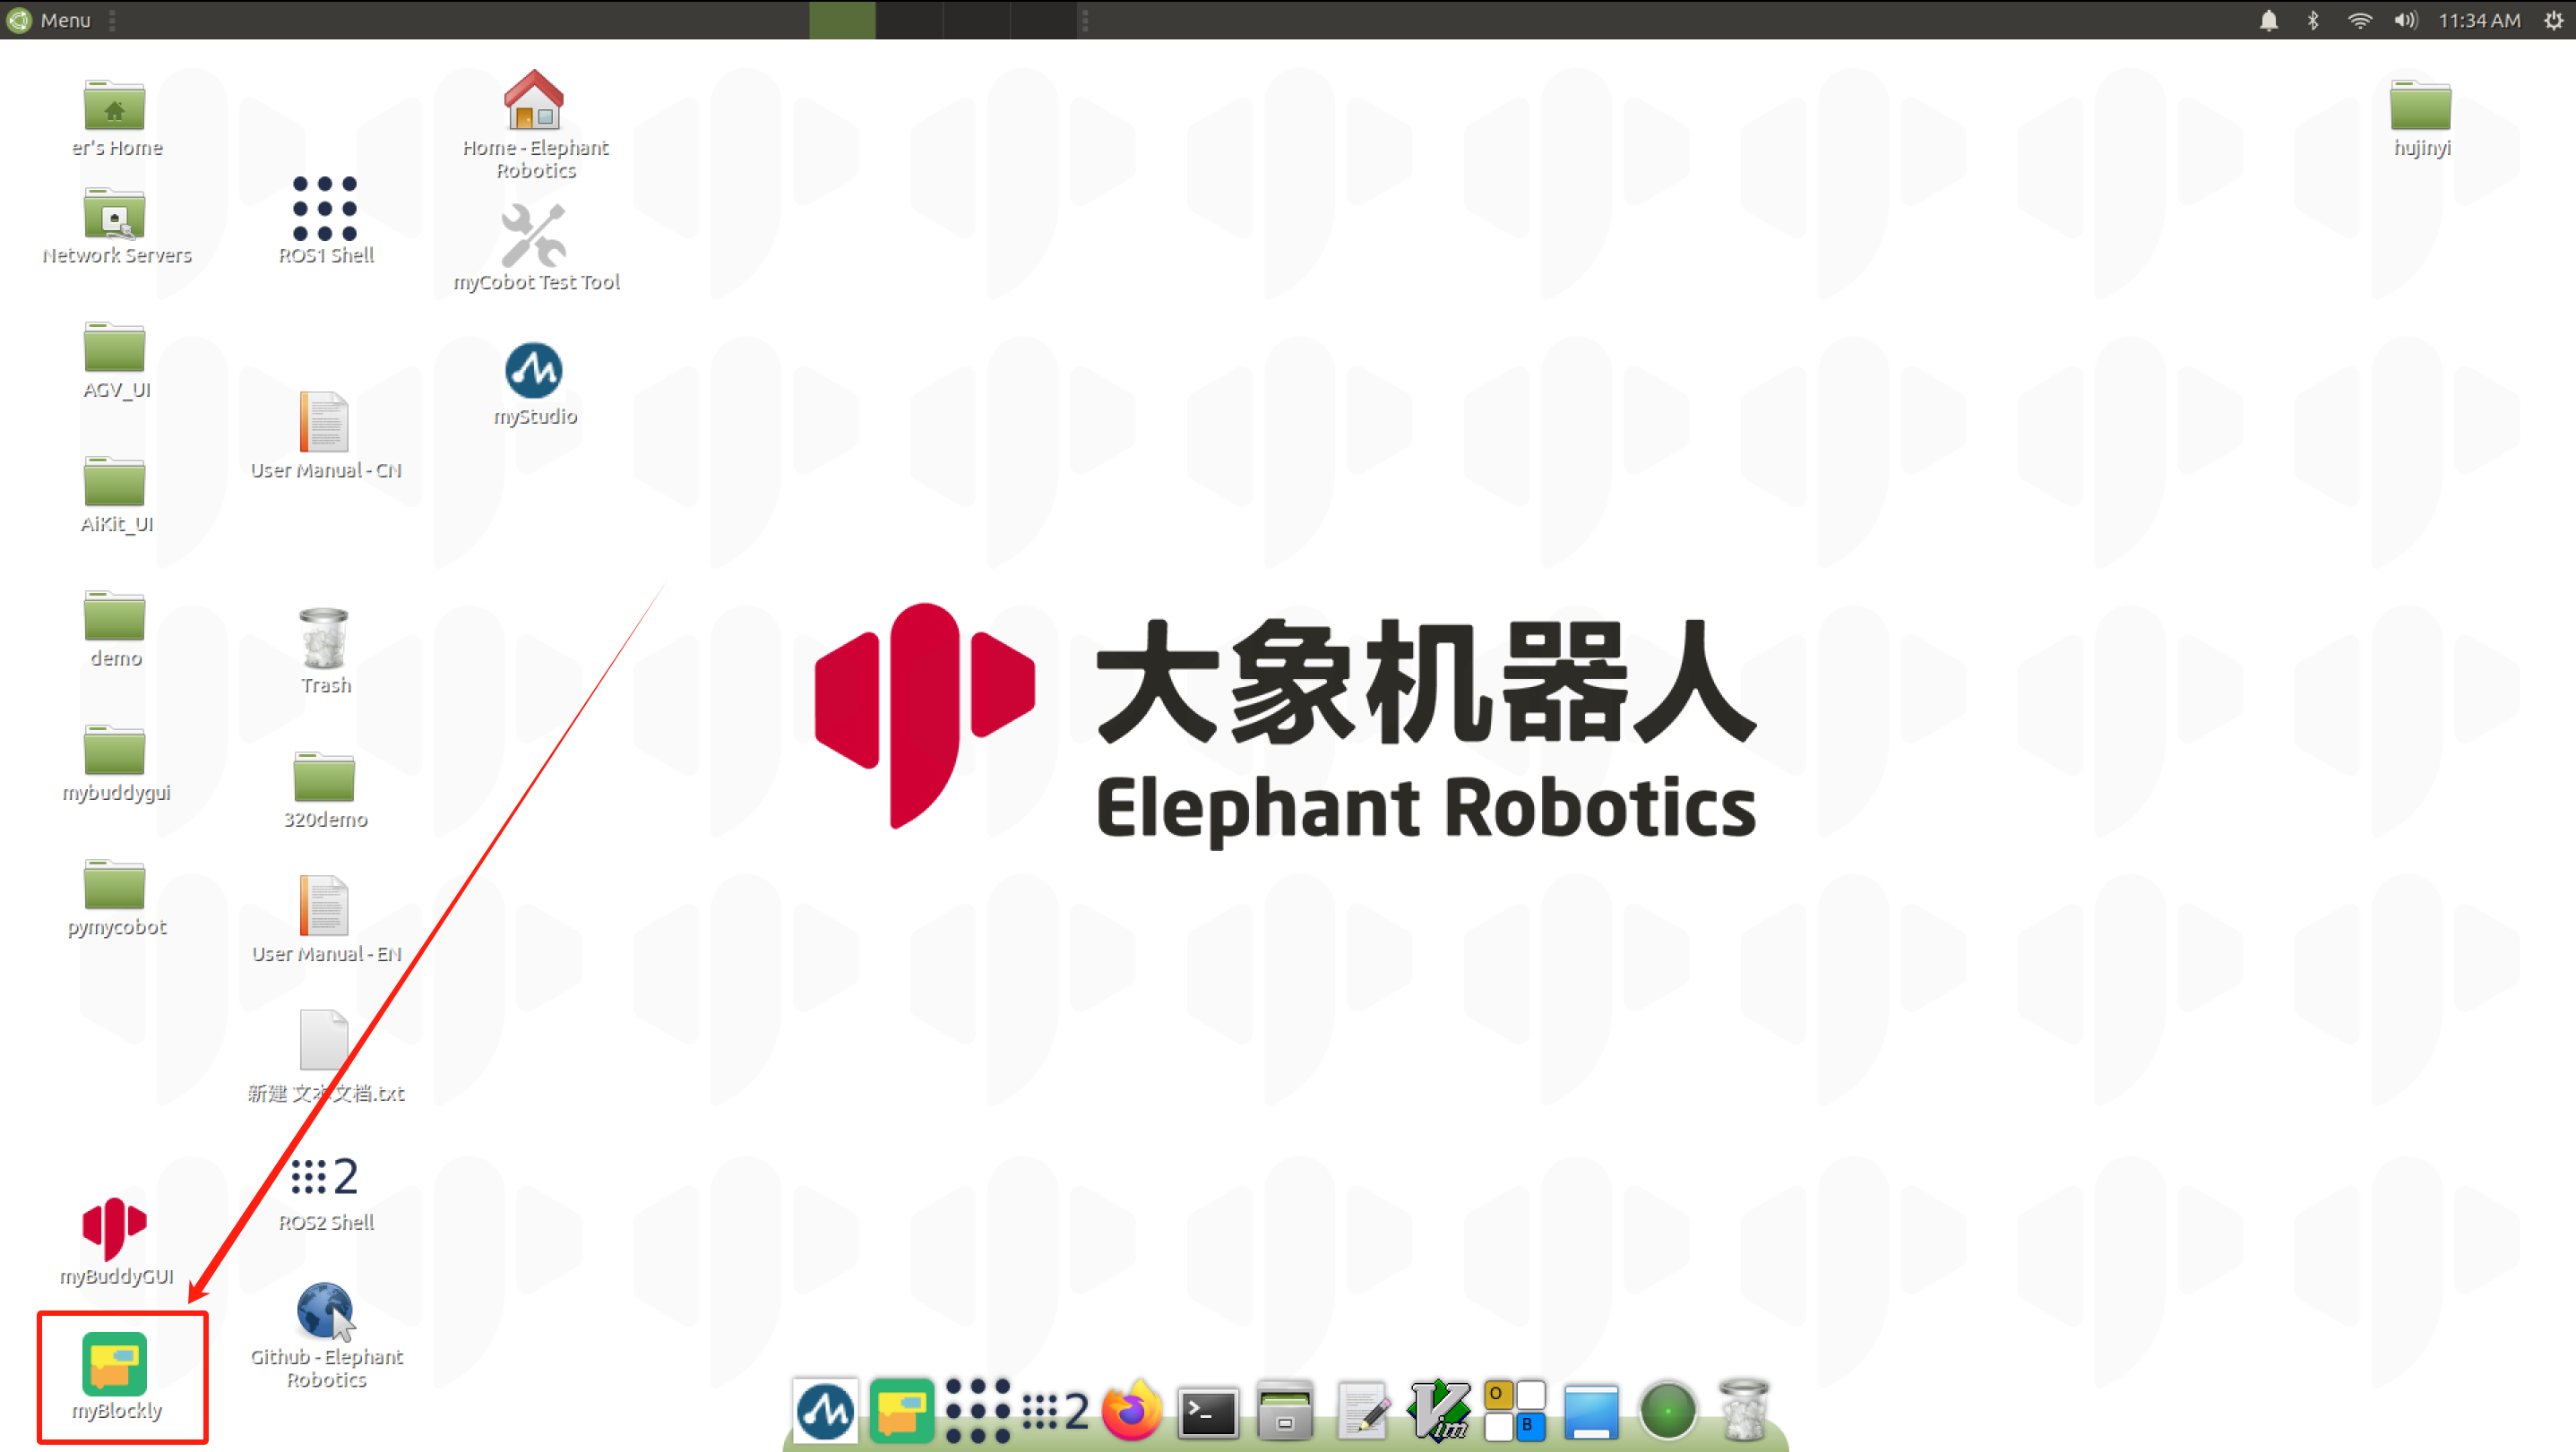
Programming Development (myblockly):
Programming and development of the gripper using myblockly: myblockly download
Port Passthrough Mode Method 1:
- After confirming that the structural and electrical connections are complete, start the arm and open the myblockly software when the graphical interface appears.
- Modify the baud rate to 115200.

- Find
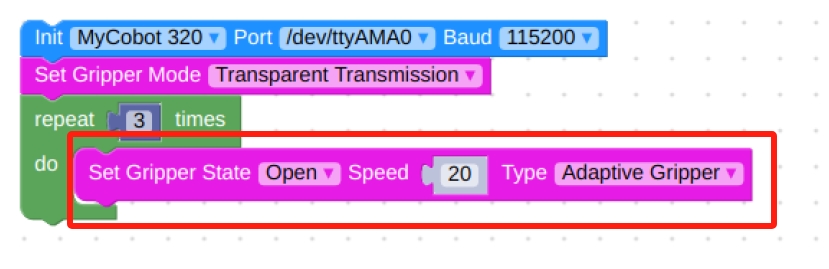
Gripperin the list on the left and select theSet Gripper Modemodule. - Drag and drop under the
initmodule and selectTransparent Transmission.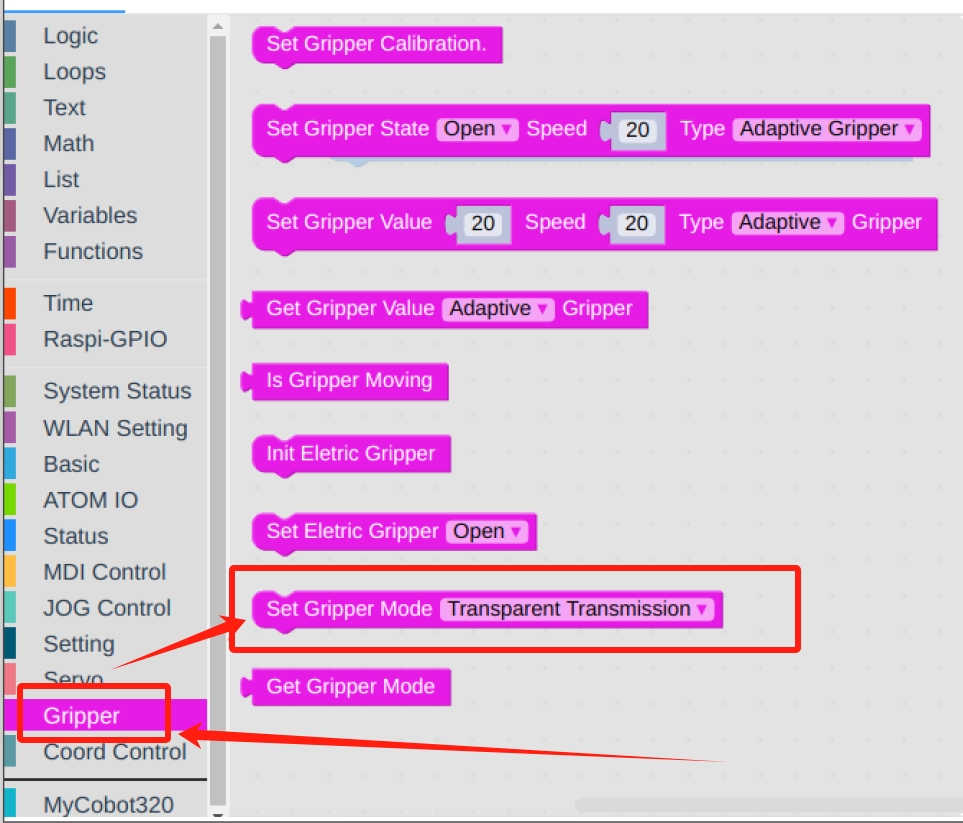
- In
Loops, selectrepeatmodule.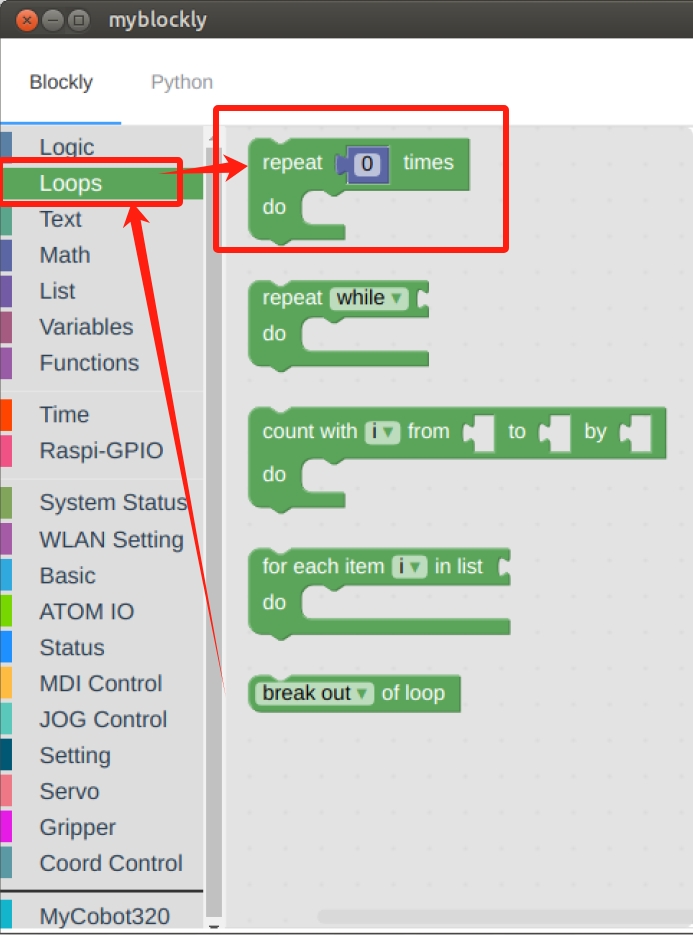
- Set the times to
3 times.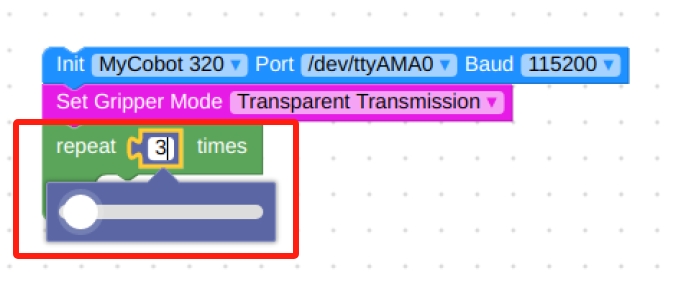
- In
Gripper, select theSet Gripper Statemodule, put it in therepeatmodule, set it to open at 20 speed, and the gripper type to Adaptive Gripper.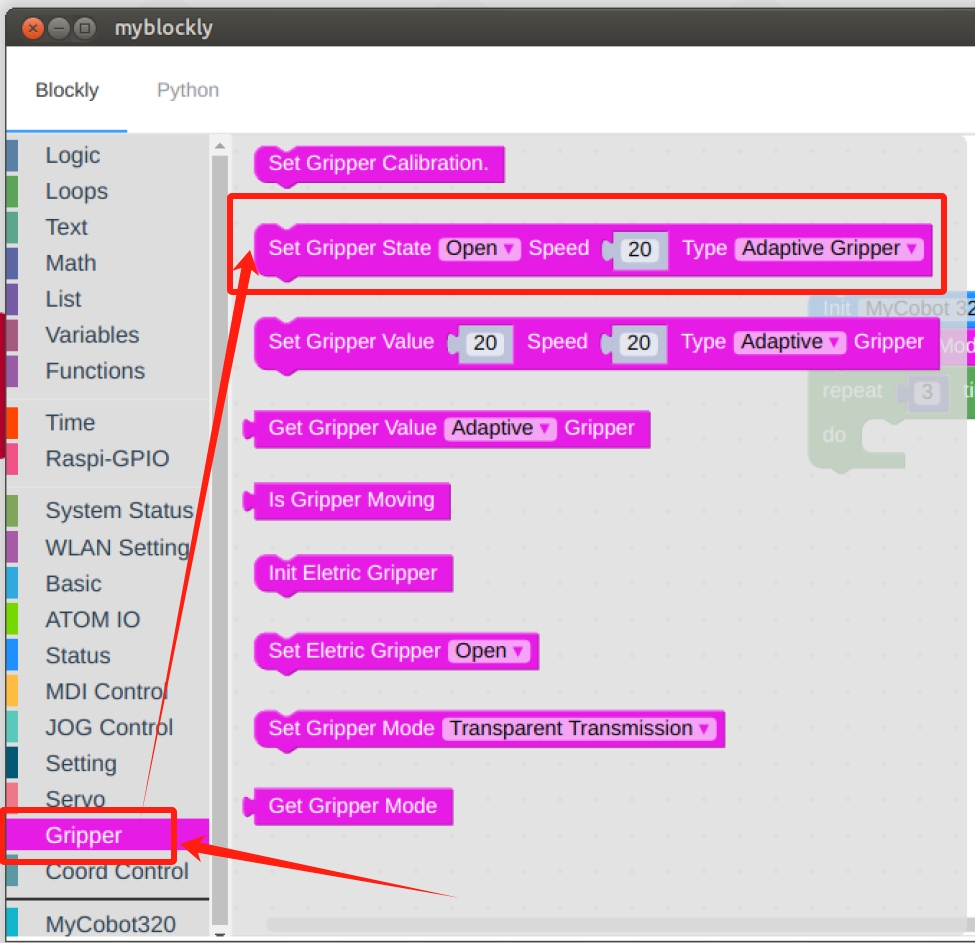
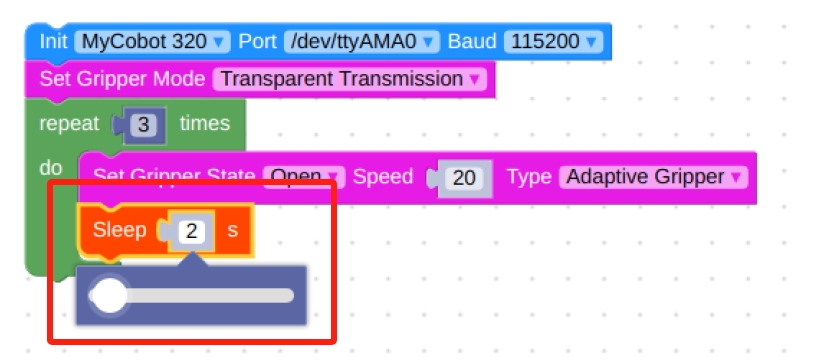
- In
Time, find theSleepmodule and set the time to 2s, the purpose is to give the gripper time to make a movement.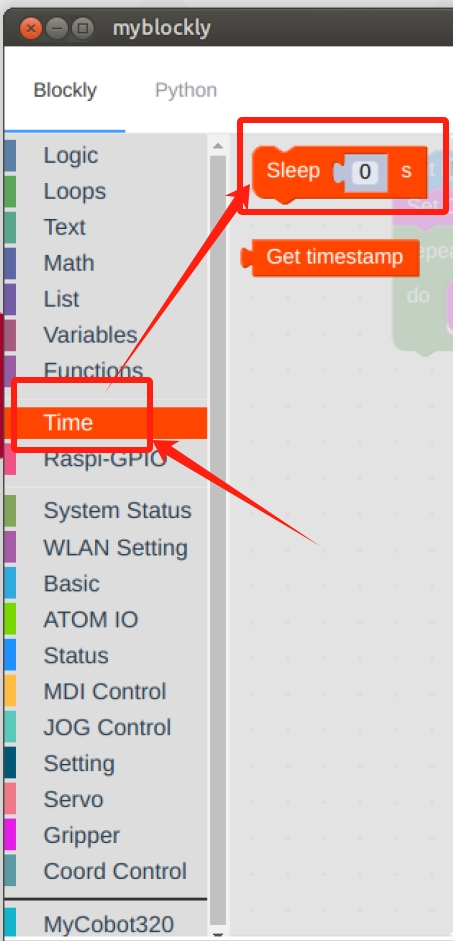
- In
Gripper, select theSet Gripper Statemodule, put it in therepeatmodule, set it to close at 20 speed, and the gripper type to Adaptive Gripper.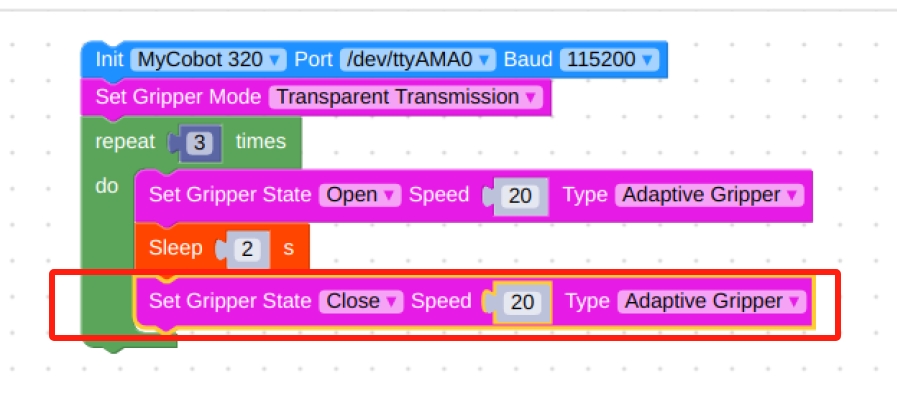
- In
Time, find theSleepmodule and set the time to 2s, the purpose is to give the gripper time to make a movement.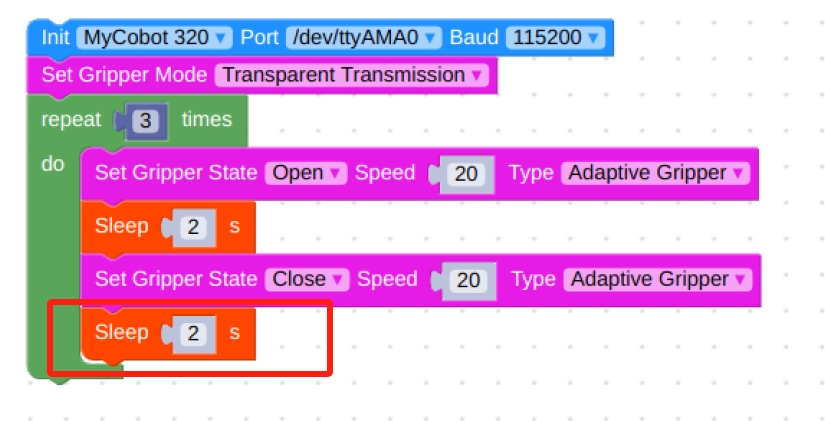
Final flowchart and code.
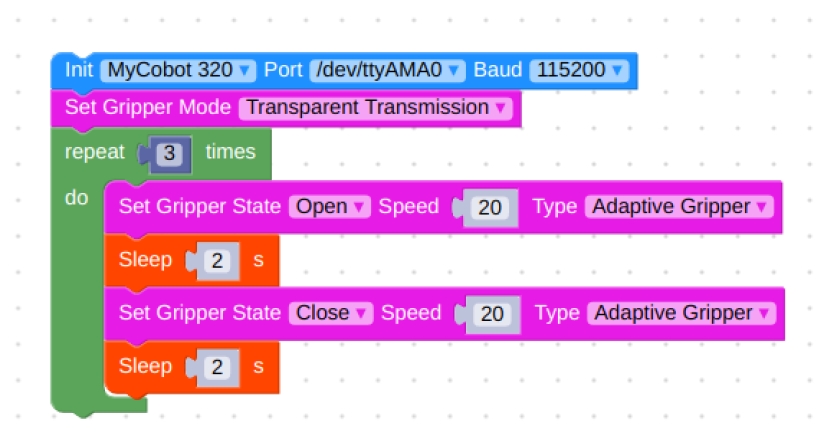
from pymycobot import MyCobot320 import time mc = MyCobot320('/dev/ttyAMA0', 115200) mc.set_gripper_mode(0) for count in range(3): mc.set_gripper_state(0,20,1) time.sleep(2) mc.set_gripper_state(1,20,1) time.sleep(2)- Click on the green running icon in the upper right corner to see the gripper
open-close-openin motion.
- After confirming that the structural and electrical connections are complete, start the arm and open the myblockly software when the graphical interface appears.
Port Passthrough Mode Method 2:
- The process framework is the same as method 1, except that the
Set Gripper Modemodule is replaced bySet Gripper Value.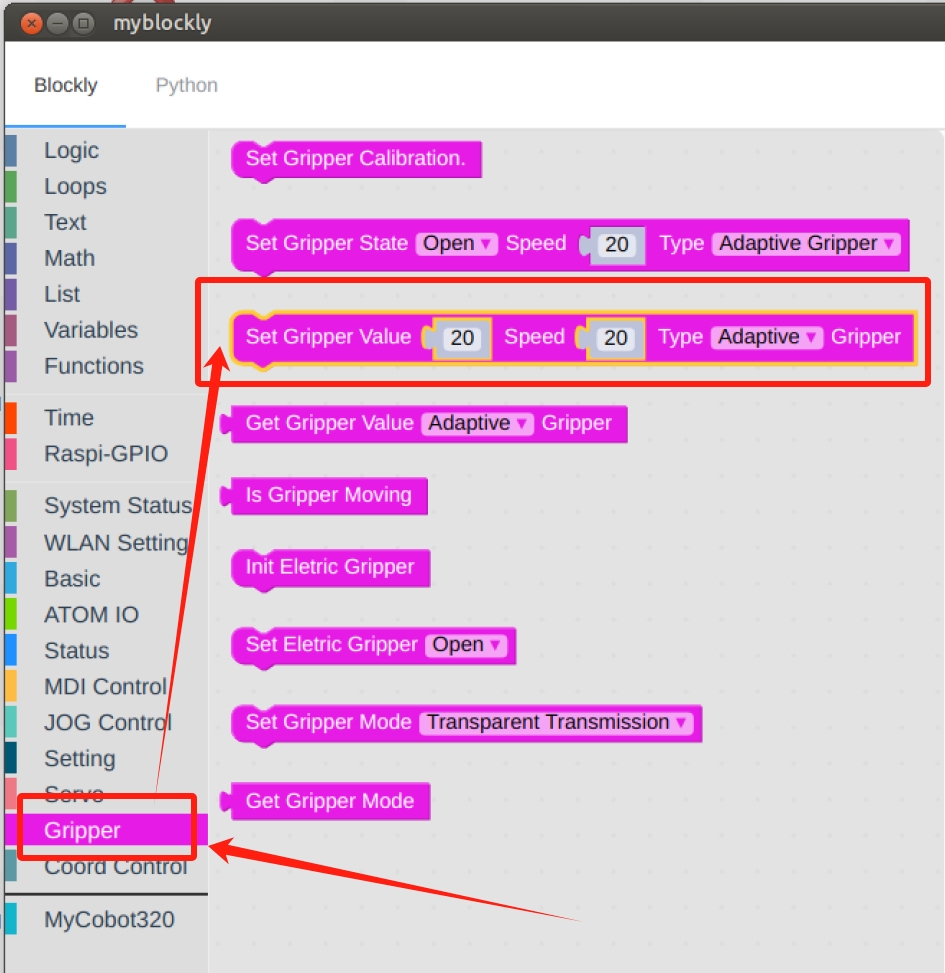
Final flowchart and code.
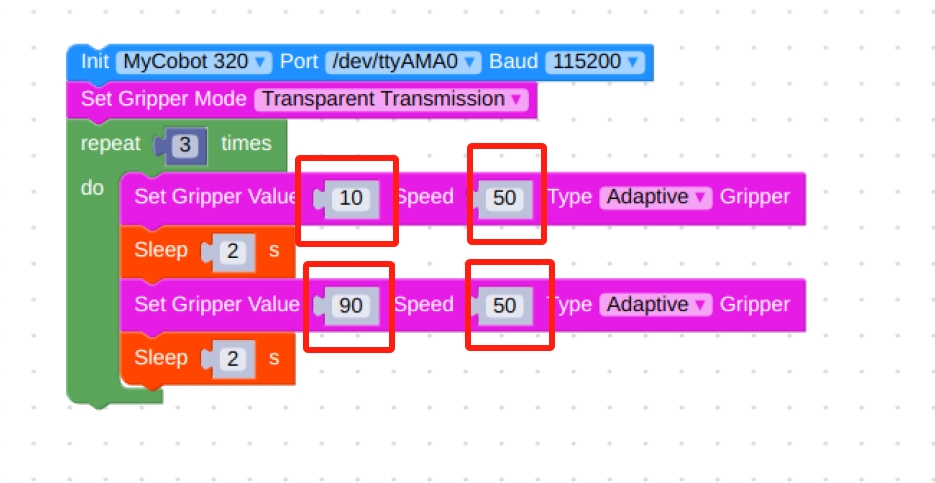
   from pymycobot import MyCobot320
   import time

   mc = MyCobot320('/dev/ttyAMA0', 115200)
   mc.set_gripper_mode(0)
   for count in range(3):
      mc.set_gripper_value(10,50,1)
      time.sleep(2)
      mc.set_gripper_value(90,50,1)
      time.sleep(2)
- The process framework is the same as method 1, except that the
IO Control Mode:
Note: When switching back to IO mode from pass-through mode, you need to power off and restart the machine before you can use IO mode normally.
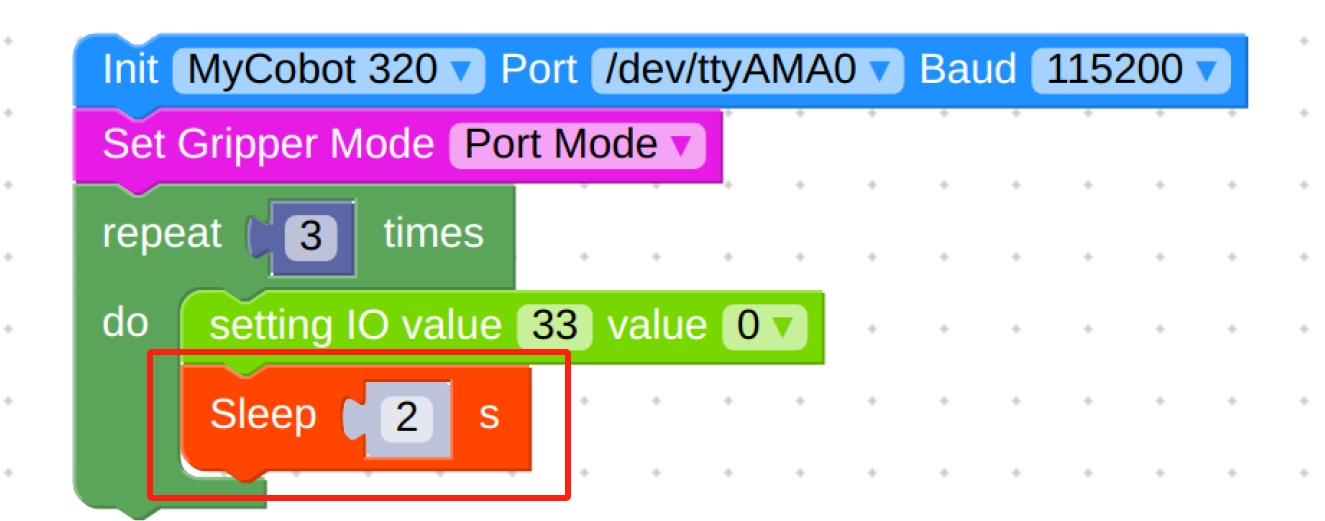
- Setting the
Set Gripper Modemodule to Port Mode.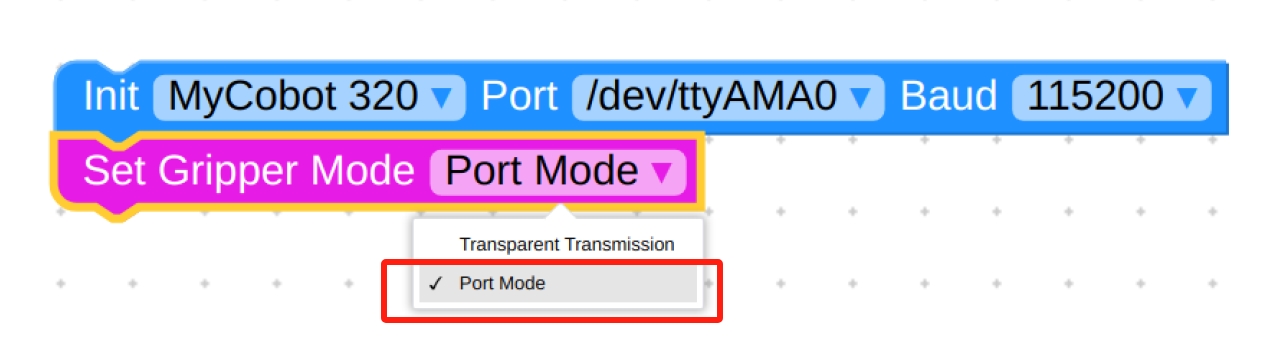
- Again select the
repeatmodule and loop through it three times.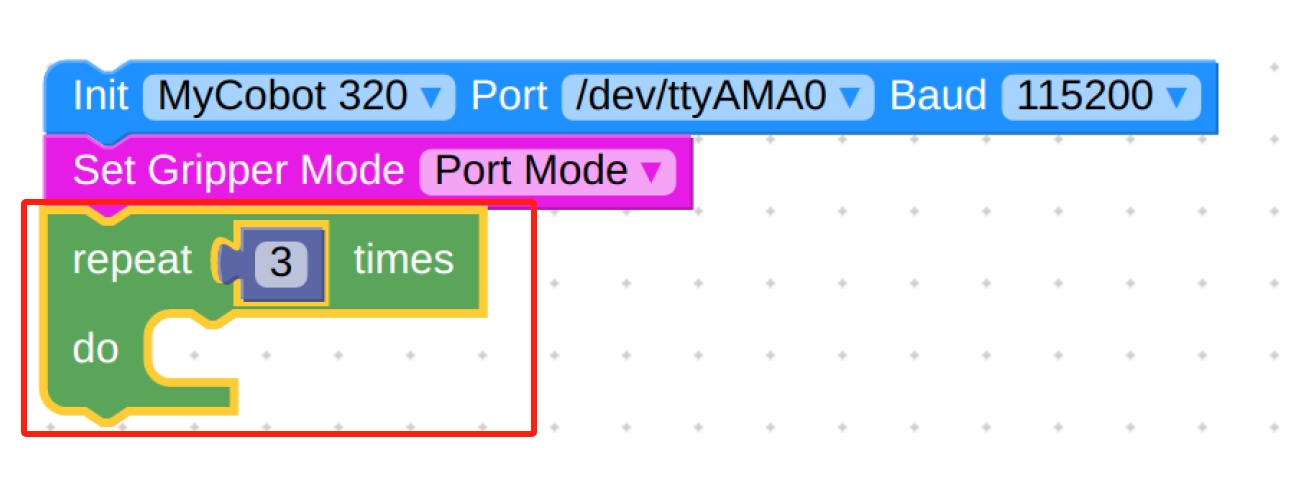
- In
ATOM IOselect theSetting IO valuemodule.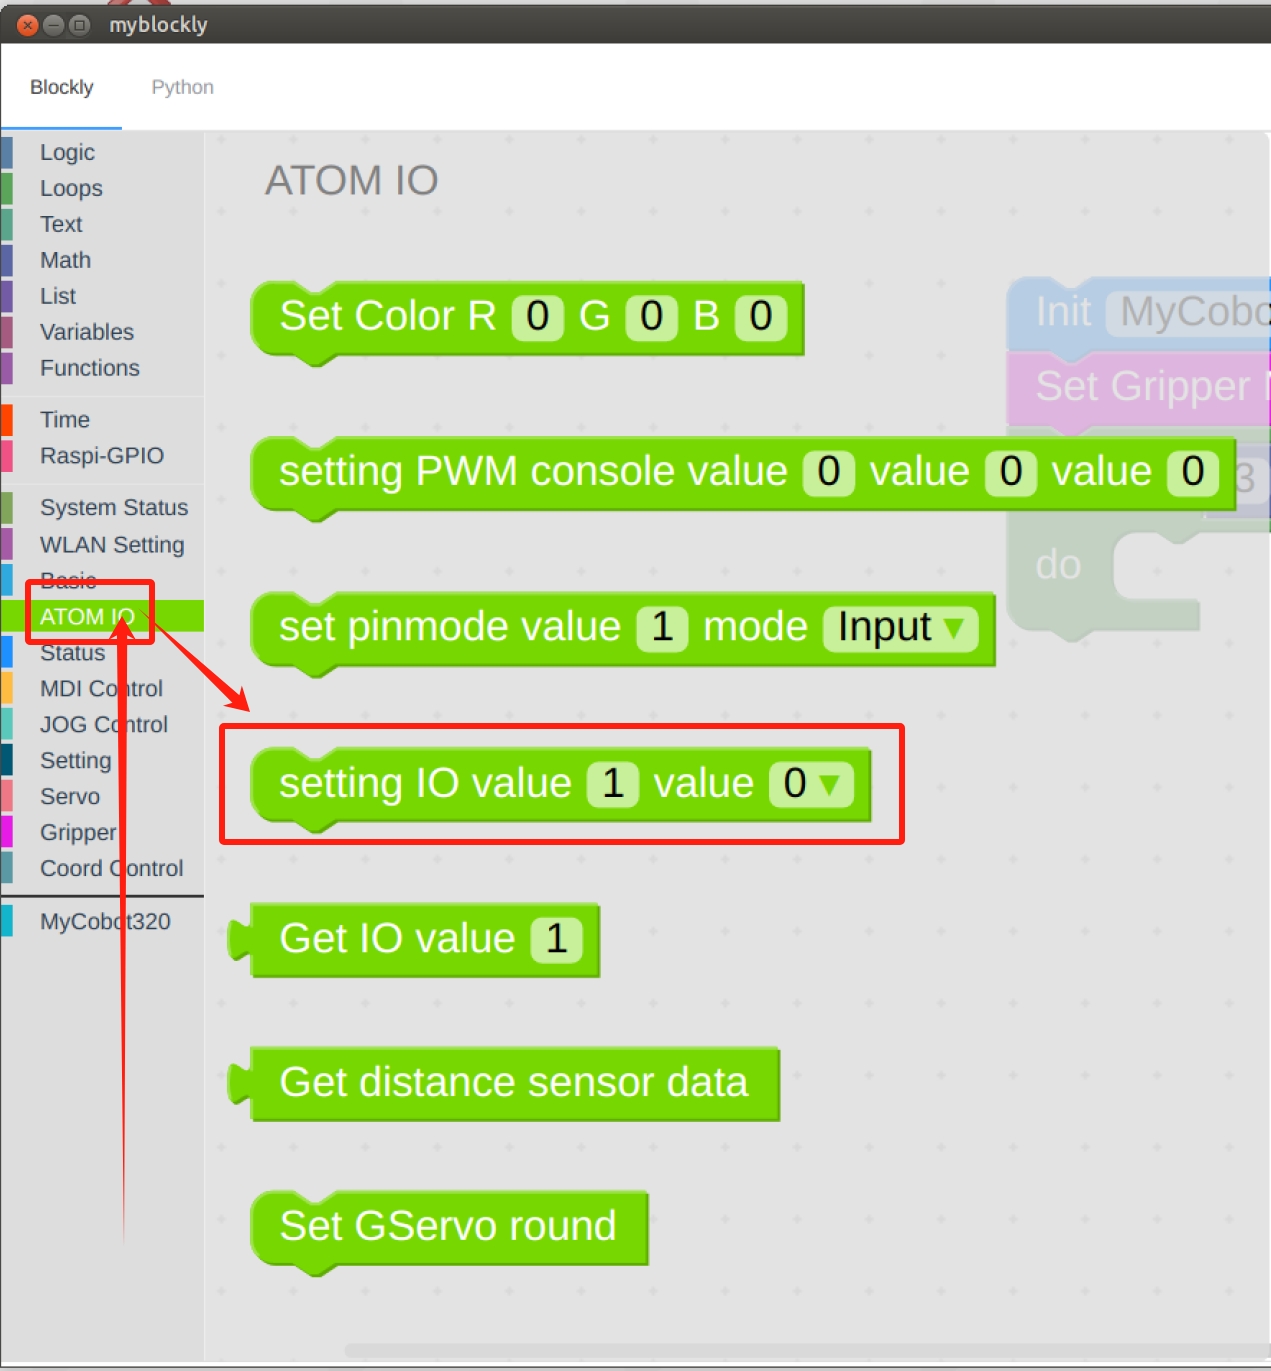
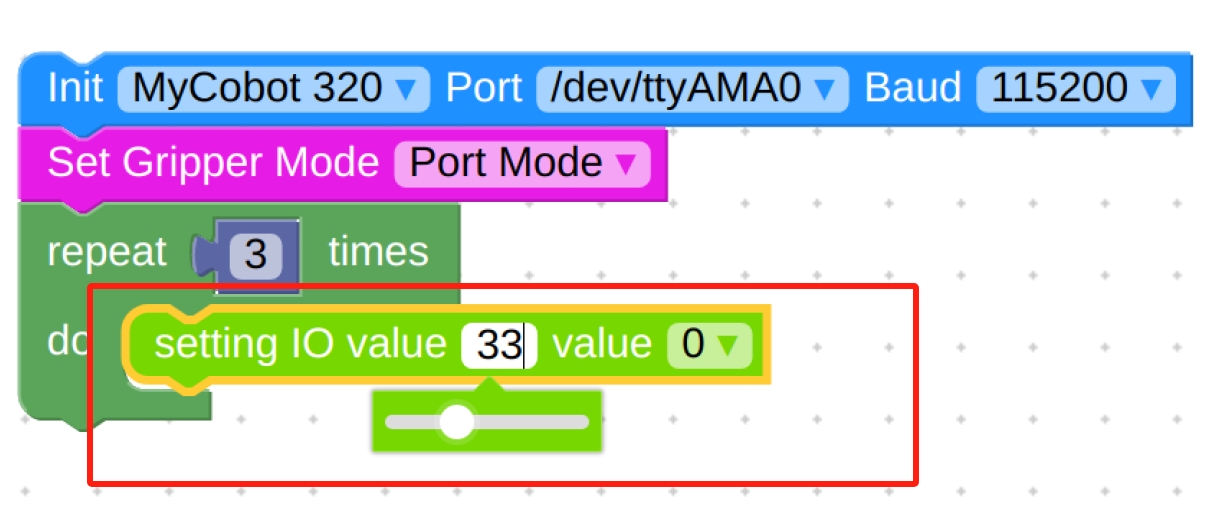
- Set the IO port to 33 with a value of 0.
- In
Timeselect theSleepmodule.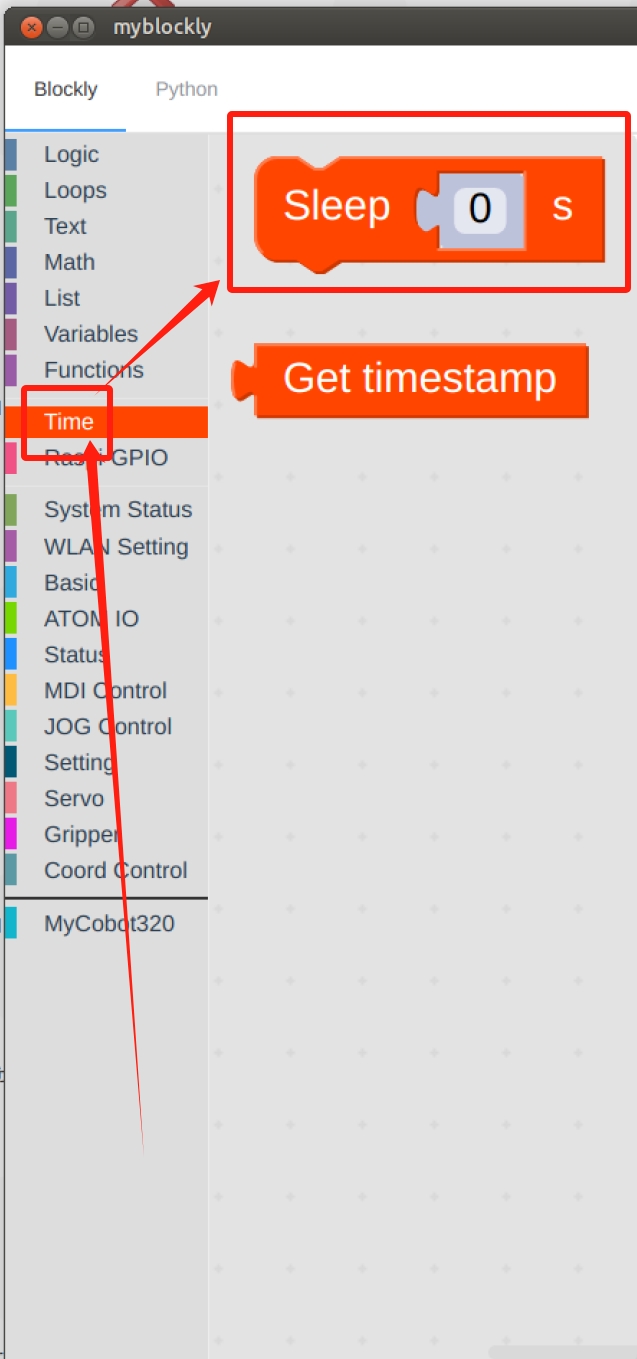
- Setting time to 2s.
- Repeat the selection of the
Setting IO valueandSleepmodules, noting the change of IO number and the change of value.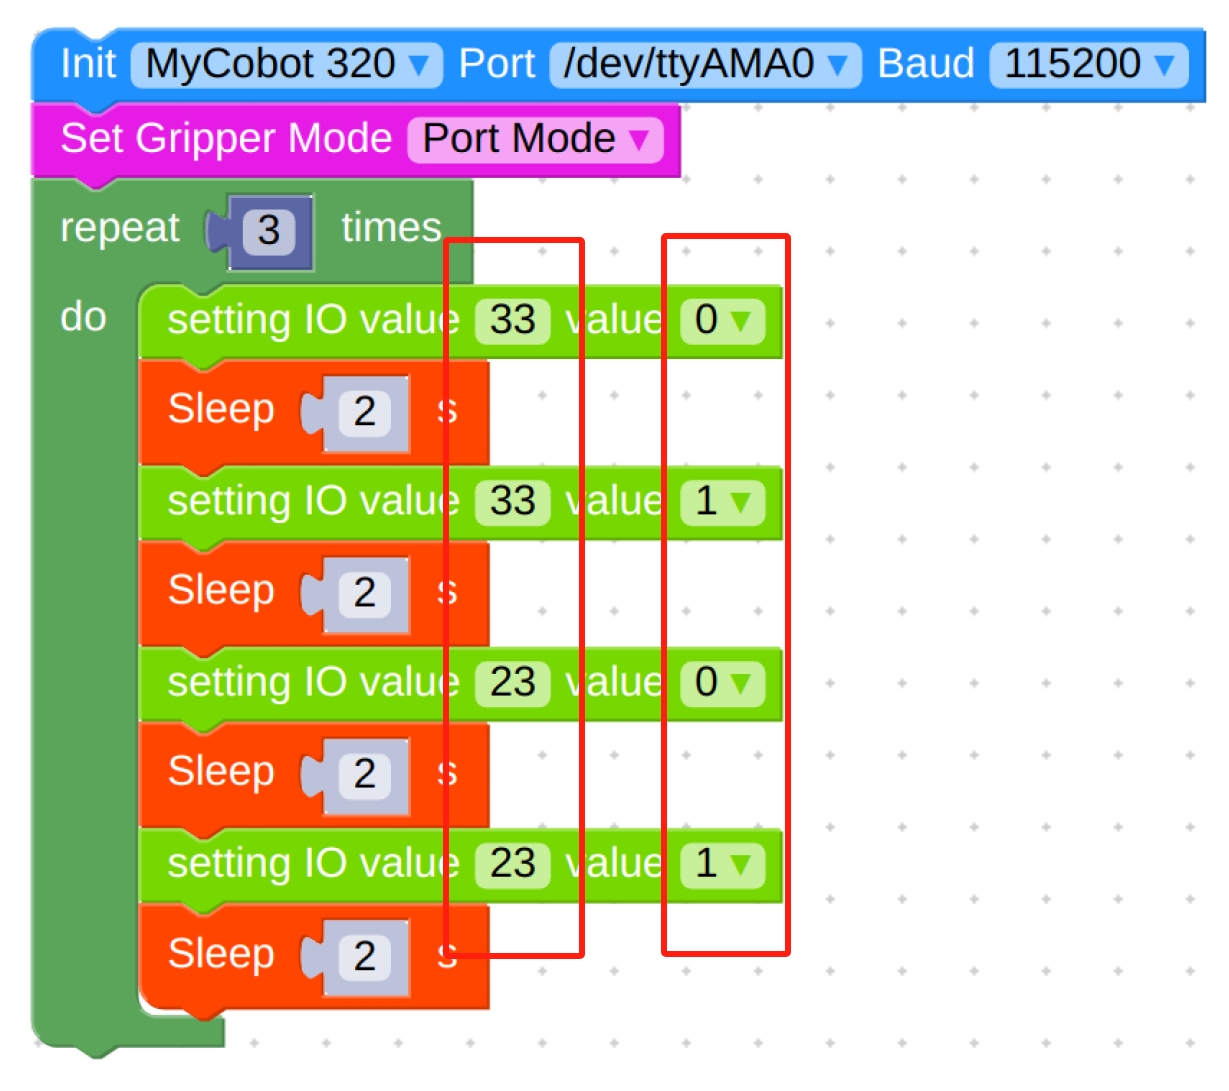
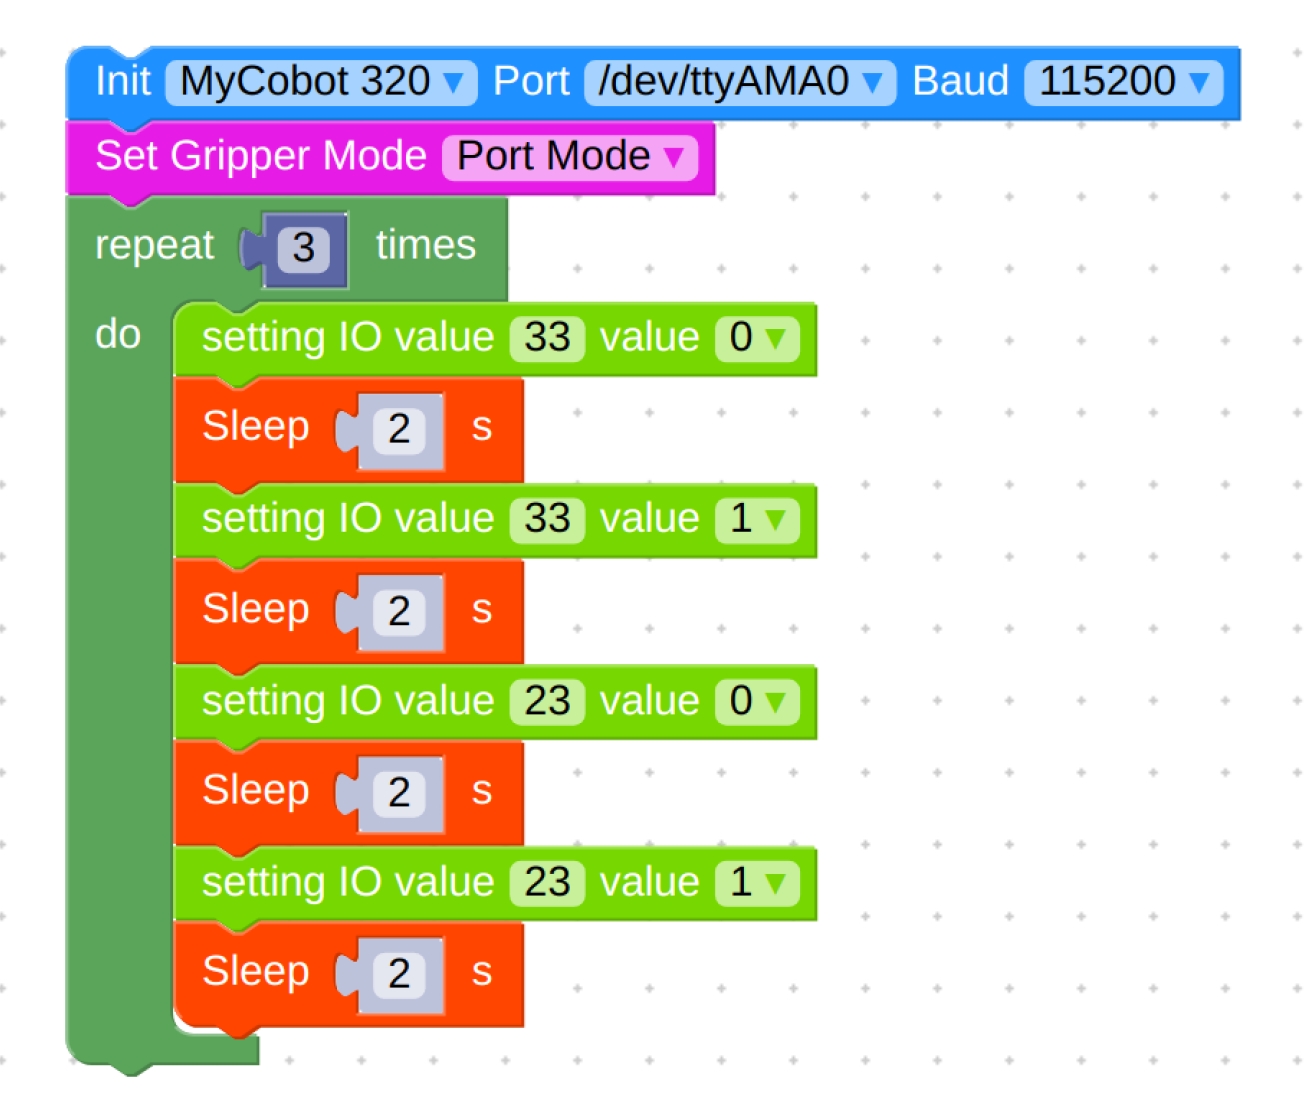
- Final flowchart and code.
 ```python
from pymycobot import MyCobot320
import time
```python
from pymycobot import MyCobot320
import time
mc = MyCobot320('/dev/ttyAMA0', 115200) mc.set_gripper_mode(1) for count in range(3): mc.set_digital_output(33, 0) time.sleep(2) mc.set_digital_output(33, 1) time.sleep(2) mc.set_digital_output(23, 0) time.sleep(2) mc.set_digital_output(23, 1) time.sleep(2) ```- Setting the
Pro600 Directions for use
Function description:
Run RoboFlow, enter the program editing interface, and select M5Stack-basic – Gripper (For the way to enter the program editing interface, see 6.2 Simple use of RoboFlow);
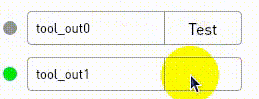
IO mode (I/O is selected by the Tool, and the overall steps are shown in the figure)
IO controls the jaw opening and closing, the pin tool_out0 is closed, and the jaw is opened when it tool_out1 is opened
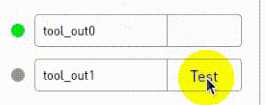
IO controls the jaw opening and closing, the pin tool_out0 is closed, and the jaw is opened when it tool_out1 is opened
click Define New Gripper, fill in Gripper Name as " CAG-1 ” (must be this name), and then click Save;
select open or close for Saved status. The overall steps are shown in the following figure:
(Note: Before using the transparent transmission mode, you need to set the gripper to the transparent transmission mode, that is, set_cag_gripper_mode (0), please refer to Socket API) for detailed interface use.)

python Control
- Use case:
from pymycobot import ElephantRobot
import time

# Change the ip to the live ip of the P600 Raspberry Pi

elephant_client = ElephantRobot("192.168.10.158", 5001)

# Start the necessary commands for the robot
elephant_client.start_client()
elephant_client.state_off()
time.sleep(3)
# elephant_client.power_off()#it is not necessary to turn off the robot using only the gripper passthrough mode
# time.sleep(3)
elephant_client.power_on()
time.sleep(3)
elephant_client.state_on()
time.sleep(3)


# #IO mode
# # # #The gripper is fully open and fully closed, and it should be noted that when the gripper is transparently switched to IO mode, the machine needs to be turned off first and then restarted once before switching back to the IO mode of the gripper
for i in range(3):
    elephant_client.set_digital_out(16, 0)  # IO Restore low
    time.sleep(1)
    elephant_client.set_digital_out(17, 0)  # IO Restore low
    time.sleep(1)
    elephant_client.set_digital_out(16, 1)  # close gripper
    time.sleep(1)
    elephant_client.set_digital_out(16, 0)  # IO Restore low
    time.sleep(1)
    elephant_client.set_digital_out(17, 1)  # open gripper
    time.sleep(1)

# Transparent transmission mode
# elephant_client.set_cag_gripper_mode(0)
# time.sleep(1)
# for i in range(3):
#     elephant_client.set_cag_gripper_value(26,20)
#     time.sleep(1)
#     elephant_client.set_cag_gripper_value(86,20)
#     time.sleep(1)

elephant_client.command_wait_done()
scoket Control
- First, open the TCP service in roboflow
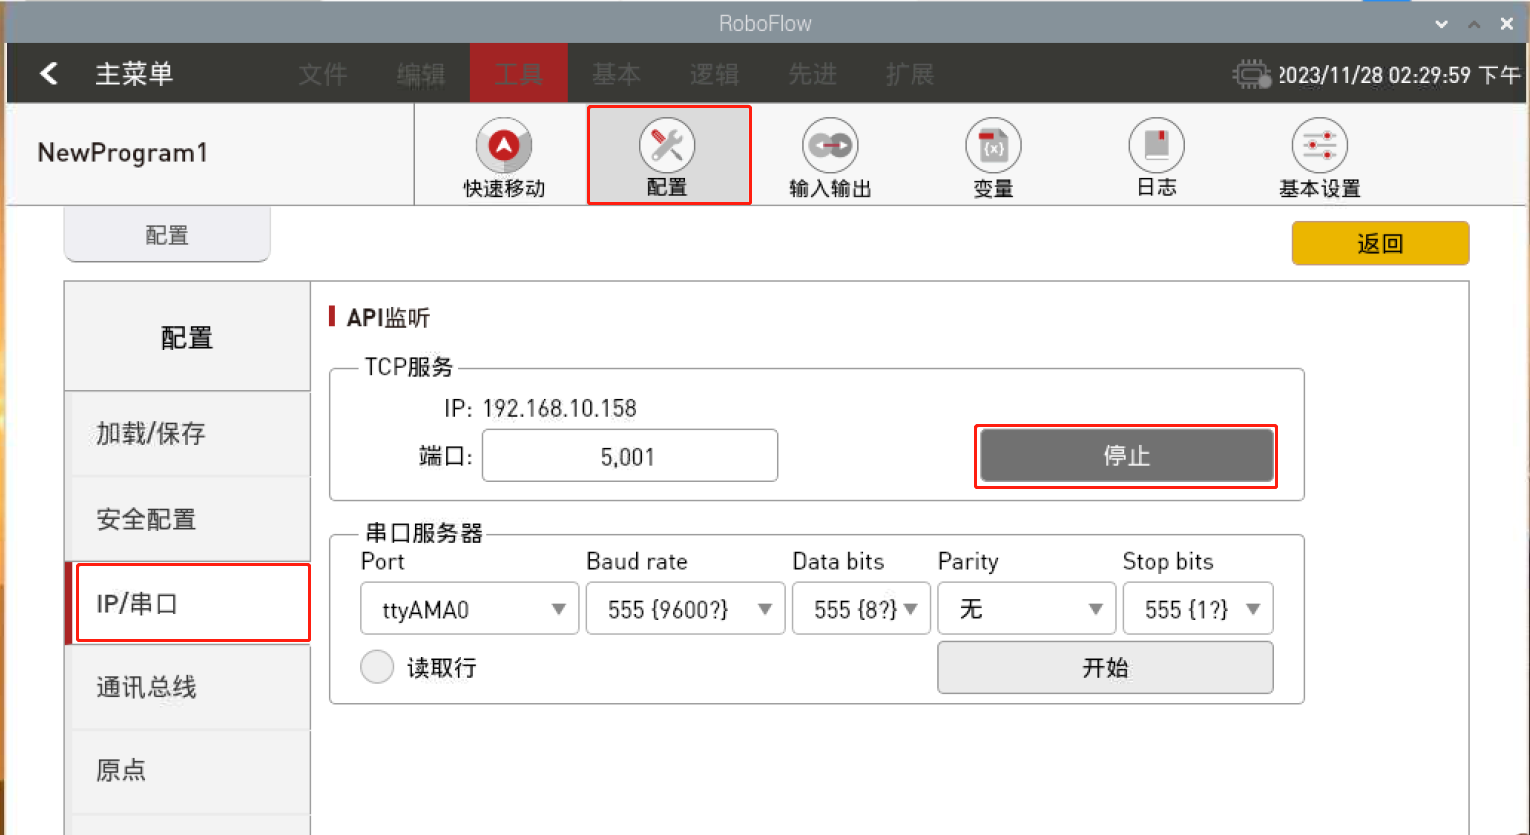
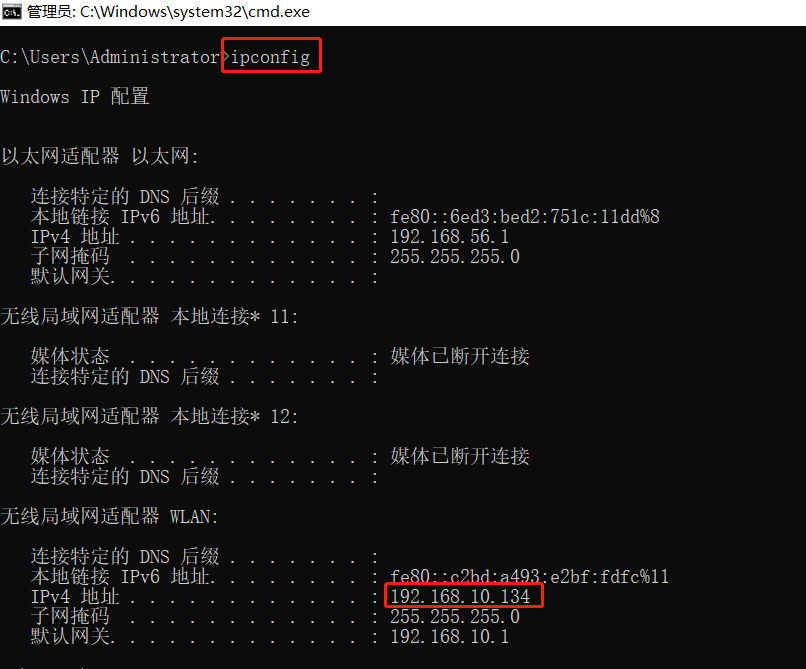
You can obtain the IP of the P600 and the computer in the following ways:
Windows: Enter ipconfig in the cmd command window
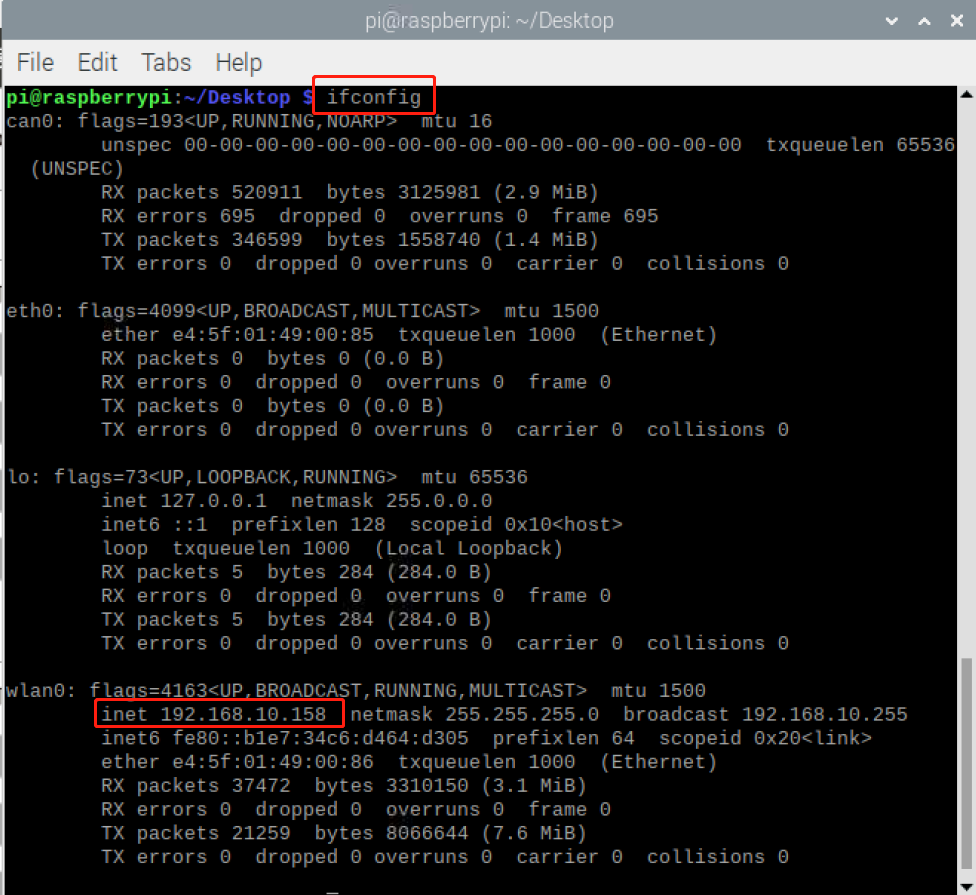
- P600: Enter ifconfig on the terminal to obtain the device
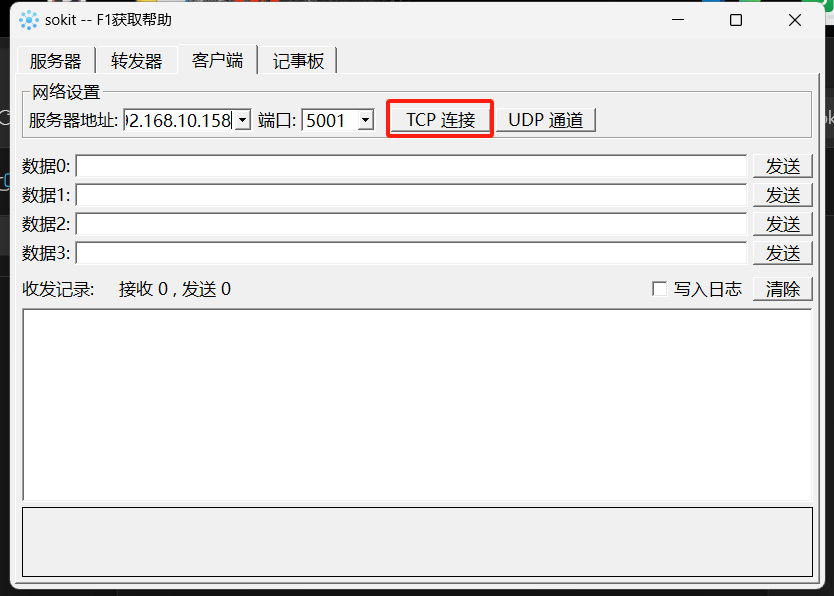
- Open the socket software, click the client button and enter the IP address obtained above

- Click on the TCP connection to prompt the connection to open

socket uses IO mode to control the jaw opening and closing
Pin 16 low pin 17 high level is the gripper open, pin 16 high pin 17 low level is the gripper off
socket uses transparent transmission mode to control the opening and closing of the gripper
To use the transparent transmission mode to control the opening and closing of the gripper, you need to set the gripper mode to transparent transmission first, and the specific interface can be referred toSocket API
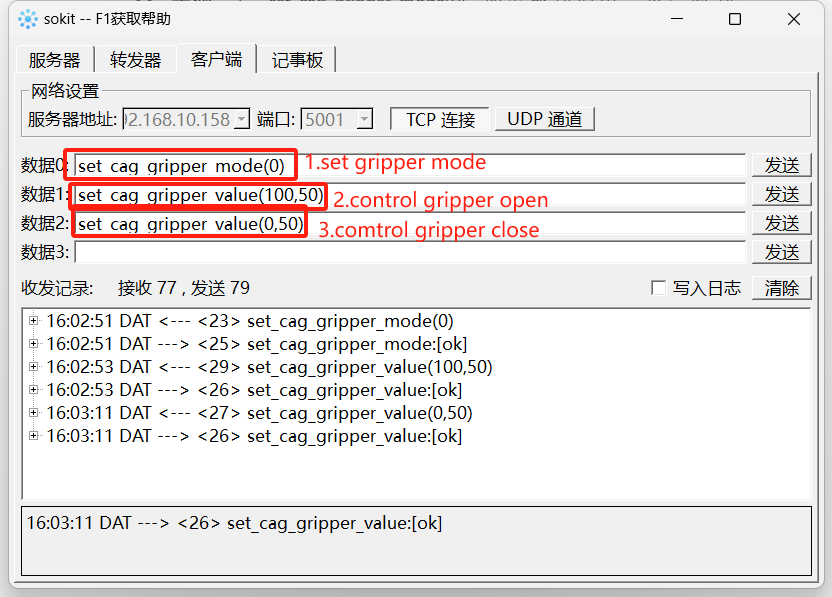
Compatible models:myCobot 320、myCobot Pro 600
Product illustration
Specifications:
| name | mycobotPro Adaptive gripper gray |
|---|---|
| model | myCobotPro_gripperAg_grey |
| craft | 7500nylon |
| Color | grey |
| Clamp size | 20-100mm |
| Clamp force | 1000g |
| precision | 1mm |
| Lifetime | 一年 |
| drive | 电动 |
| Transmission mode | Gears + connecting rods |
| size | 168×151×54mm |
| weight | 260g |
| Fixed | Screw-fastened |
| Requirements for the use environment | Normal temperature and pressure |
| controlSerial port control | |
| Applicable Equipment | ER myCobot 320 for M5 ER ,myCobot 320 for Pi ,ER myCobot Pro 600 |
Adaptive gripper: Grip objects for use
Brief introduction
A gripper is a robot component that can perform human-like functions. It has the advantages of complex structure, firm grasping of objects, not easy to fall, and easy to operate.
The gripper kit includes the gripper connection line and flange, and controls the end effector of the robotic arm through a programmable system to realize the functions of object grabbing, multi-point positioning and so on. Grippers can be used in all development environments, such as ROS, Arduino, Roboflow, etc。
How it works
- Driven by the motor, the finger surface of the gripper moves in a straight line to achieve opening or closing action, the acceleration and deceleration of the electric gripper can be controlled, the impact on the workpiece can be minimized, the positioning point is controllable, and the clamping is controllable.
Applicable Objects
- Small cubes
- globule
- Long objects
Taobao link:https://item.taobao.com/item.htm?spm=a1z10.5-c-s.0.0.6945364bve0QX4&id=637681935217
How to use:
Gripper installation:
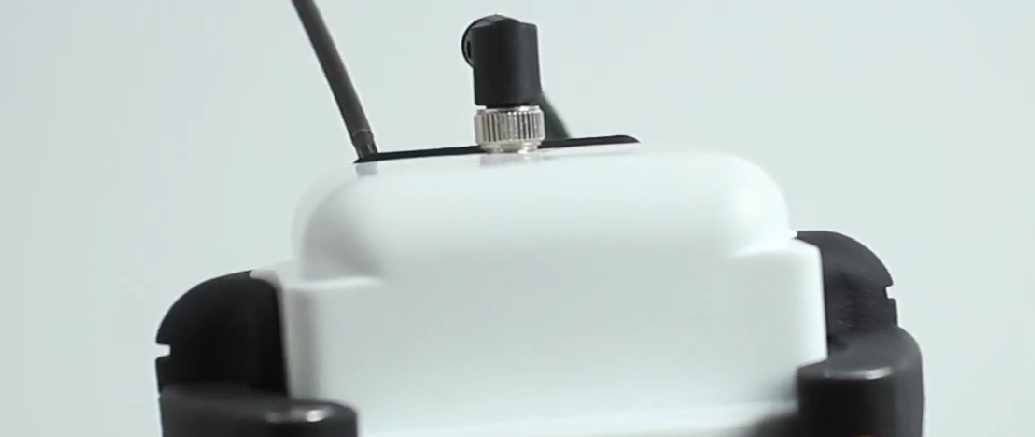
- mycobotProThe adaptive gripper is plugged into the 485 connector on the top, as shown in the figure below:

myCobot 320Directions for use
- M5 version:
from pymycobot import MyCobot320
import time

# Initialize a MyCobot320 object
mc = MyCobot320("COM3", 115200)

# The following three ways can control the gripper to open-close-open
# Method 1:
mc.set_gripper_state(0, 80)
time.sleep(3)
mc.set_gripper_state(1, 80)
time.sleep(3)
mc.set_gripper_state(0, 80)
time.sleep(3)

# Method 2:
# mc.set_gripper_value(100, 80)
# time.sleep(3)
# mc.set_gripper_value(0, 80)
# time.sleep(3)
# mc.set_gripper_value(100, 80)
# time.sleep(3)
- Pi version:
from pymycobot import MyCobot320
from pymycobot import PI_PORT, PI_BAUD  # When using the Raspberry Pi version of mycobot, you can refer to these two variables for MyCobot320 initialization
import time

# Initialize a MyCobot320 object
mc = MyCobot320(PI_PORT, PI_BAUD)

# The following three ways can control the gripper to open-close-open
# Method 1:
mc.set_gripper_state(0, 80)
time.sleep(3)
mc.set_gripper_state(1, 80)
time.sleep(3)
mc.set_gripper_state(0, 80)
time.sleep(3)

# Method 1:
# mc.set_gripper_value(100, 80)
# time.sleep(3)
# mc.set_gripper_value(0, 80)
# time.sleep(3)
# mc.set_gripper_value(100, 80)
# time.sleep(3)
myCobot Pro 600 Directions for use
Controlled by Roboflow
Run RoboFlow, enter the program editing interface, and select M5Stack-basic--Gripper (how to enter the program editing interface, please see6.2 RoboFlow Simple Use);
Click Define New Gripper, set the Gripper Name to CAG-1 (must be this name), and click Save.
Select open or close for Saved status, as shown in the following figure: